I commented yesterday that I was disappointed with the card buildings so I had another look at them. I noticed that the roof tabs had a white unprinted area on them and closer inspection showed that this made the tabs too long.
![]()
So I decided to cut off the white area and see if that made a difference and it did. The tabs now fit well and the roof is more level. If you're having problems assembling your card buildings give this a try
So having assembled the two test APCs it was time to pick a colour scheme. There's plenty of colour scheme suggestions in the main rulebook if you're short of ideas. I'd decided to go with a base spray of Army Painter 'Army Green' primer for the UCM. Block painting in details like radiator grills etc and then giving it a coat of Army Painter dip and a spray of matt varnish to finish. However I planned to take a different approach with the Scourge. I was going to spray prime them white and then use a purple wash as a base picking out the details in green and gold.
However when I went to check my box of spray paints the white was empty and the green was nowhere to be found. So I popped online and ordered a couple of cans. However they probably won't arrive until sometime next week. So I decided to try a desert scheme for the UCM with a base of Army Painter 'Sand' which I did have. As its only a tester model I figured if it didn't work out it wouldn't matter. If I liked it I could assemble and paint the UCM stuff while I waited for the sprays to arrive. So quick spray of sand gave me this:
![]()
The next task was to block paint the tyres black and the rims gunmetal and then paint in some detail to give it some zip. After a coat of Army Painter 'Strong' shade dip and a spray of matt varnish I got this:
![]()
I'm happy with the way it turned out and I'm going to go with this paint scheme for the rest of my UCM. I think the light base colour works well with the darker dip bringing out the details nicely. It also has a dirty, used kind of feel which I like. Just as well I couldn't find my can of green primer. I've also assembled one of each of the other UCM models on the sprue.
First up is the Sabre tank which has six parts. The gun arm has three parts that you can just push together but will need glue to make them really secure. As on all the models the parts can only be assembled one way so are easy to put together. On the Sabre there are notches to help you locate the tracks.
![]()
![]()
![]()
![]()
![]()
![]()
![]()
![]()
![]()
![]()
There is a glass canopy which you should put on after the model is painted and varnished. Don't forget to paint the pilot before you glue on the canopy! (an Airfix reference for all you old timers)
![]()
![]()
![]()
![]()

So I decided to cut off the white area and see if that made a difference and it did. The tabs now fit well and the roof is more level. If you're having problems assembling your card buildings give this a try
So having assembled the two test APCs it was time to pick a colour scheme. There's plenty of colour scheme suggestions in the main rulebook if you're short of ideas. I'd decided to go with a base spray of Army Painter 'Army Green' primer for the UCM. Block painting in details like radiator grills etc and then giving it a coat of Army Painter dip and a spray of matt varnish to finish. However I planned to take a different approach with the Scourge. I was going to spray prime them white and then use a purple wash as a base picking out the details in green and gold.
However when I went to check my box of spray paints the white was empty and the green was nowhere to be found. So I popped online and ordered a couple of cans. However they probably won't arrive until sometime next week. So I decided to try a desert scheme for the UCM with a base of Army Painter 'Sand' which I did have. As its only a tester model I figured if it didn't work out it wouldn't matter. If I liked it I could assemble and paint the UCM stuff while I waited for the sprays to arrive. So quick spray of sand gave me this:

The next task was to block paint the tyres black and the rims gunmetal and then paint in some detail to give it some zip. After a coat of Army Painter 'Strong' shade dip and a spray of matt varnish I got this:

I'm happy with the way it turned out and I'm going to go with this paint scheme for the rest of my UCM. I think the light base colour works well with the darker dip bringing out the details nicely. It also has a dirty, used kind of feel which I like. Just as well I couldn't find my can of green primer. I've also assembled one of each of the other UCM models on the sprue.
First up is the Sabre tank which has six parts. The gun arm has three parts that you can just push together but will need glue to make them really secure. As on all the models the parts can only be assembled one way so are easy to put together. On the Sabre there are notches to help you locate the tracks.


One thing to note, check that the tracks are square before the glue dries. It's not always obvious if you just push the parts together. You can see what I mean in some of the photos below.
 |
| Note the wonky track and the gap it creates along the side. |

Next we have the Rapier which is the same chassis with a different weapon. The procedure is the same except you will have to glue the gun barrel in place as it doesn't fit as well as on the Sabre.


Last is the Condor dropship. This is the most complex model with either 15 or 18 parts depending on whether you configure it with two or three carrying points. You assemble the main body and the wings first.

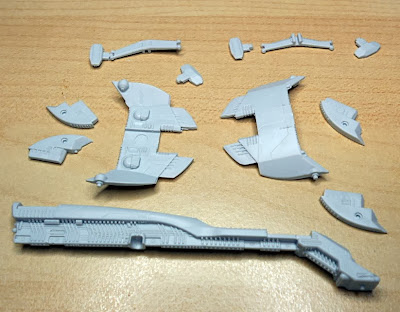
Then you add the carrying points.

There is a glass canopy which you should put on after the model is painted and varnished. Don't forget to paint the pilot before you glue on the canopy! (an Airfix reference for all you old timers)


You also get infantry but I'm going to leave those till last. The detail on them is poor in comparison to the other models but from 3 feet away they'll be fine.

I'll do a post on assembling the Scourge next week but they're even simpler to assemble than the UCM. Most of them having just a couple of parts. The infantry do look slightly better with their overcoats than the UCM, in fact they remind me of the agents in the old PC game Syndicate and that's how I'm going to paint them up.